
Super Mario Fish Tank
This one is a bit of a throwback, but felt worth including. Back in 2014 I decided I wanted to do something fun with the fish tank that I had inherited from joint ownership with my old roommates. We had previously had the typical pirate ship decor, but the tank had been sitting empty for a couple years. I had been thinking for a while about a Super Mario themed tank after seeing 2 others online, and I finally decided to go for it. After some major roadblocks (spoiler alert: legos are extremely buoyant), I came up with something that turned out pretty cool.


The Process
I can’t remember what came first—whether I had the idea for a Mario-themed fish tank and went searching for pictures online, or whether I came across a picture that sparked the idea. Regardless, I found 2 examples that seemed pretty cool. Neither had a project description, and in what would turn out to foreshadow a major design flaw, neither picture had water in the tank. But both were made out of legos and gave me a pretty good idea for how to get started.

Someone else’s tank that I found online for inspiration. Notice: no water.
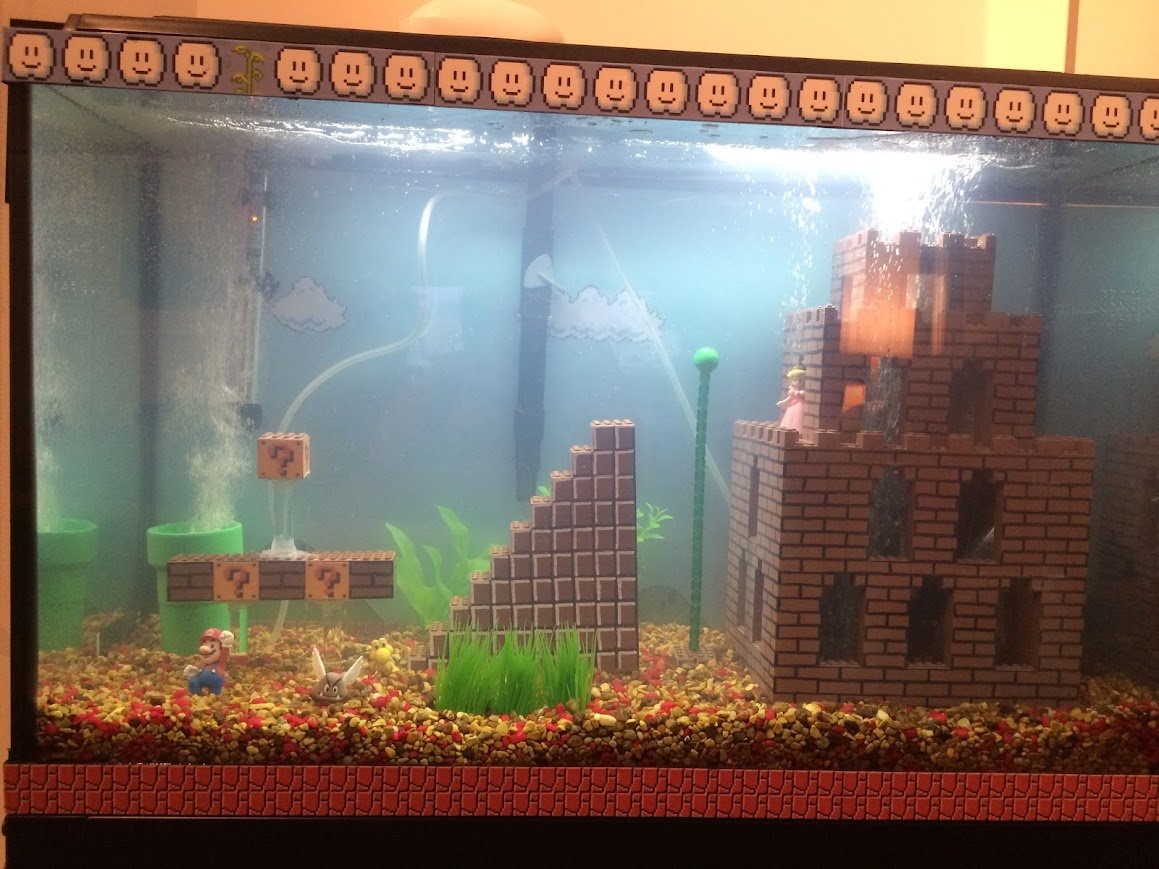
I started by coming up with the design. Because the internet is great, it was easy to download images which have entire Super Mario Brothers (the original NES game) levels/worlds in a single image. I knew I wanted to include the iconic starting blocks from the first level. I also wanted to have the warp pipe elements and the classic finish with the flag and castle. Level 1 has a pretty sad small castle in the game, and I wanted to go with a bigger one, so I took some liberties with a castle from later levels.

Super Mario Brothers 1-1 in a single image!
Stitching together images from World 1-1 and a later level, I came up with the following design:

Based on the size of the tank and the ratios of the key components above, I knew roughly the size of each piece. And while no one has written a step-by-step guide for building Mario castles out of legos, I was able to get at least a sense of how the others had done it. I ordered a big batch of brown lego pieces as well as some clear plastic dowels (to make things “float”), fluorescent green spray paint, and some plastic cement. I also picked up some PVC pipe components from Home Depot that look exactly like warp pipes already.

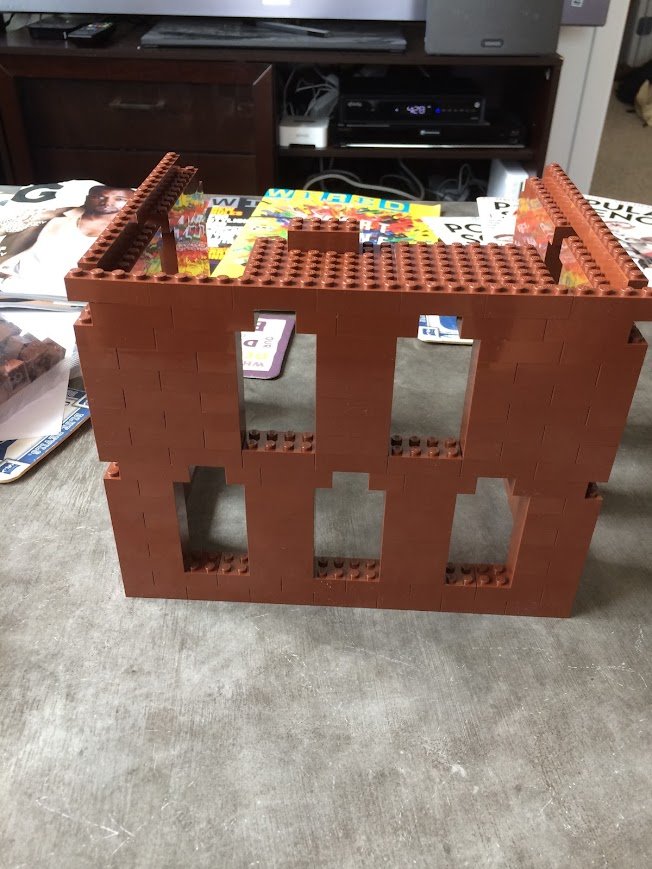
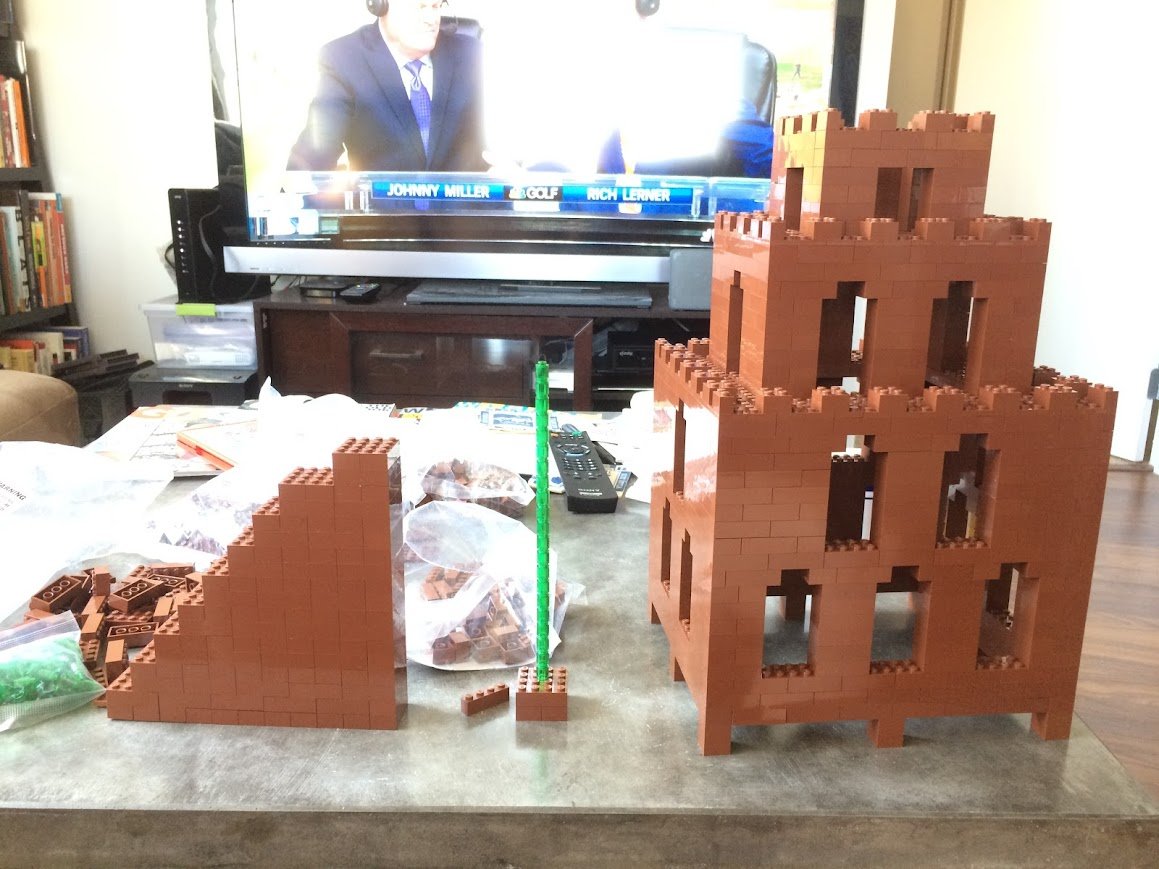
I started by building the base of the castle, since this would be the major element. Things went pretty well, though you can see some initial gaps. It’s really hard to know ahead of time with something like this what type of lego pieces you’ll need and at what quantity. I had bought a bunch of common pieces: 2x4s, 2x2s, and 1x4s, but in the picture above you can see that the offsetting design left some 1x3 gaps that I couldn’t fill at the time, so I had to make another order.
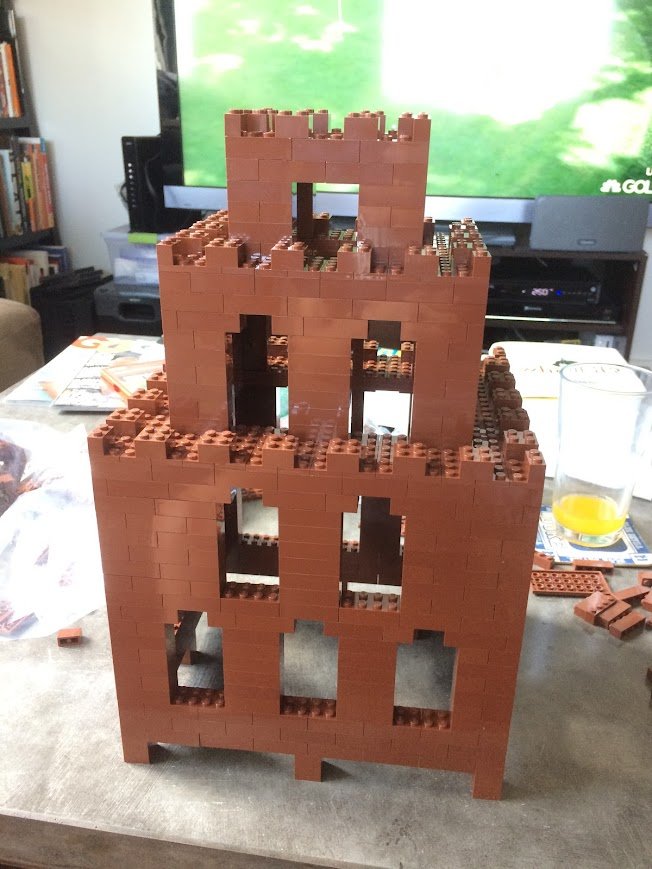
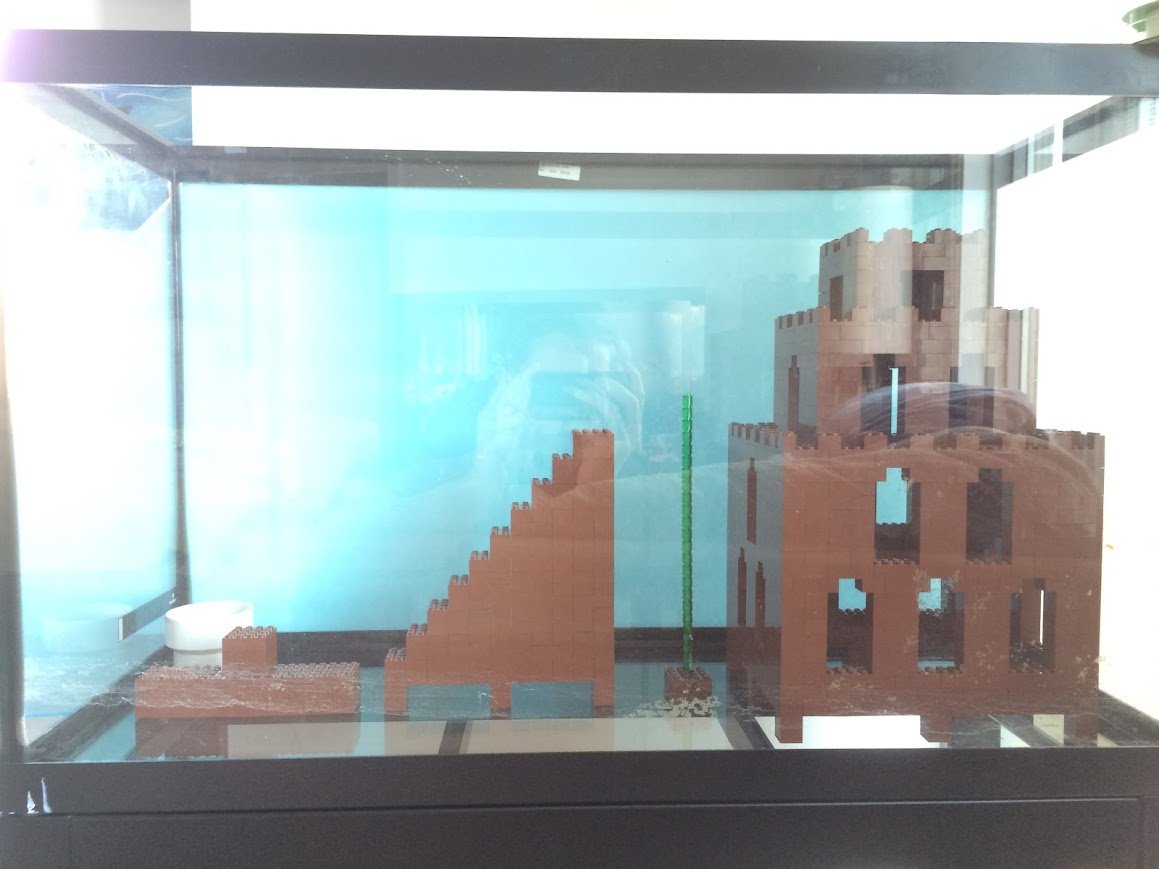
I test-fit the base of the castle with the 3 warp pipes I had planned to include, and it was clear things were going to get a little crowded. So the design was down-sized to include only a single warp pipe. With another batch of legos in, I fished the castle as well as building the stairs, flagpole, and brick and ? blocks. I was able to lay out the whole thing in the tank and see that everything fit pretty well. I also added a background of blue paper taped onto the back of the tank to provide the sky coloring.
Aside: I don’t know if I was terrible at taking pictures in 2014, or everything was just out of focus back then. Hard to say.
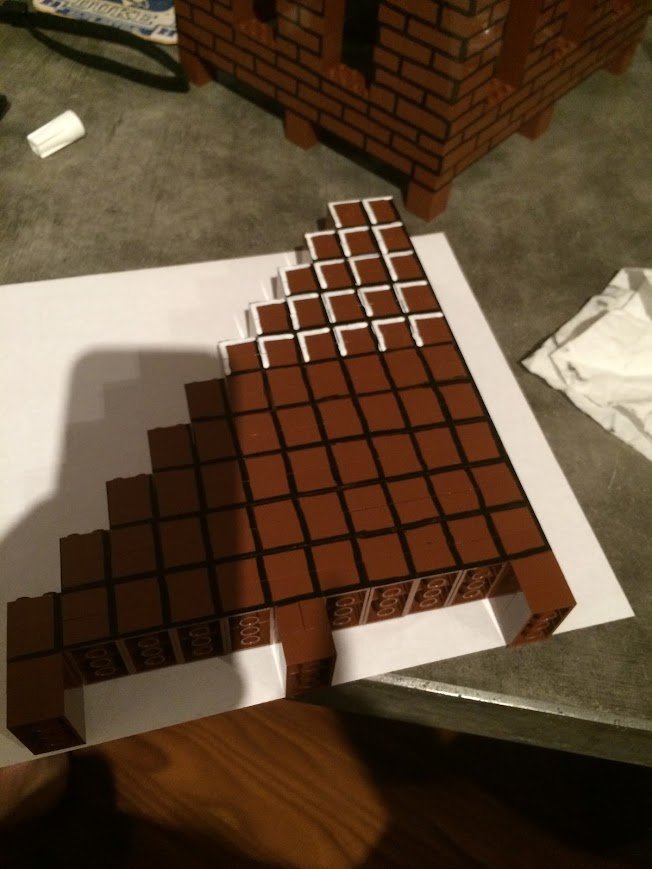
To complete the look of the pieces, I spray painted the warp pipes and hand-drew the brick borders with a paint pen. I was mostly tracing lego edge lines, so it wasn’t too bad. To create the depth look on the stairs, I stole the technique from the other tank above and traced half the brick edge with a white paint pen.


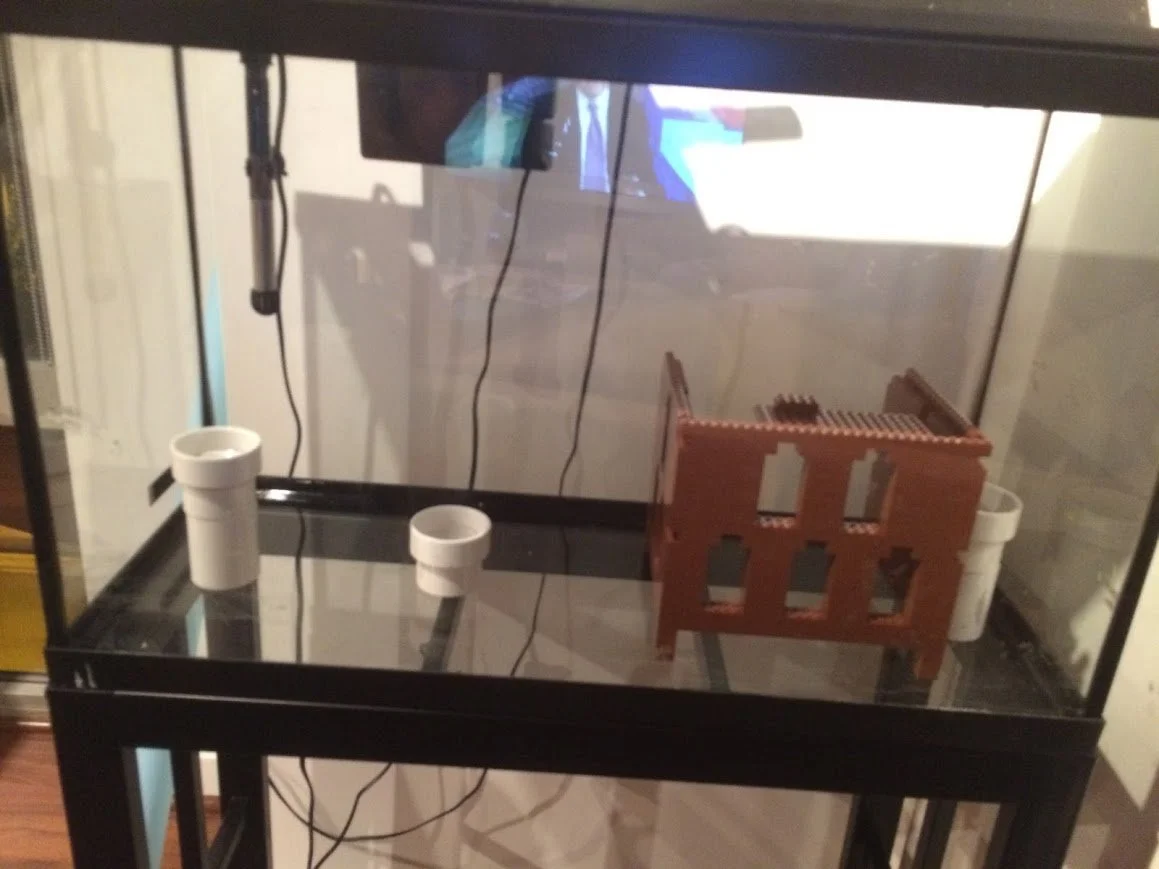
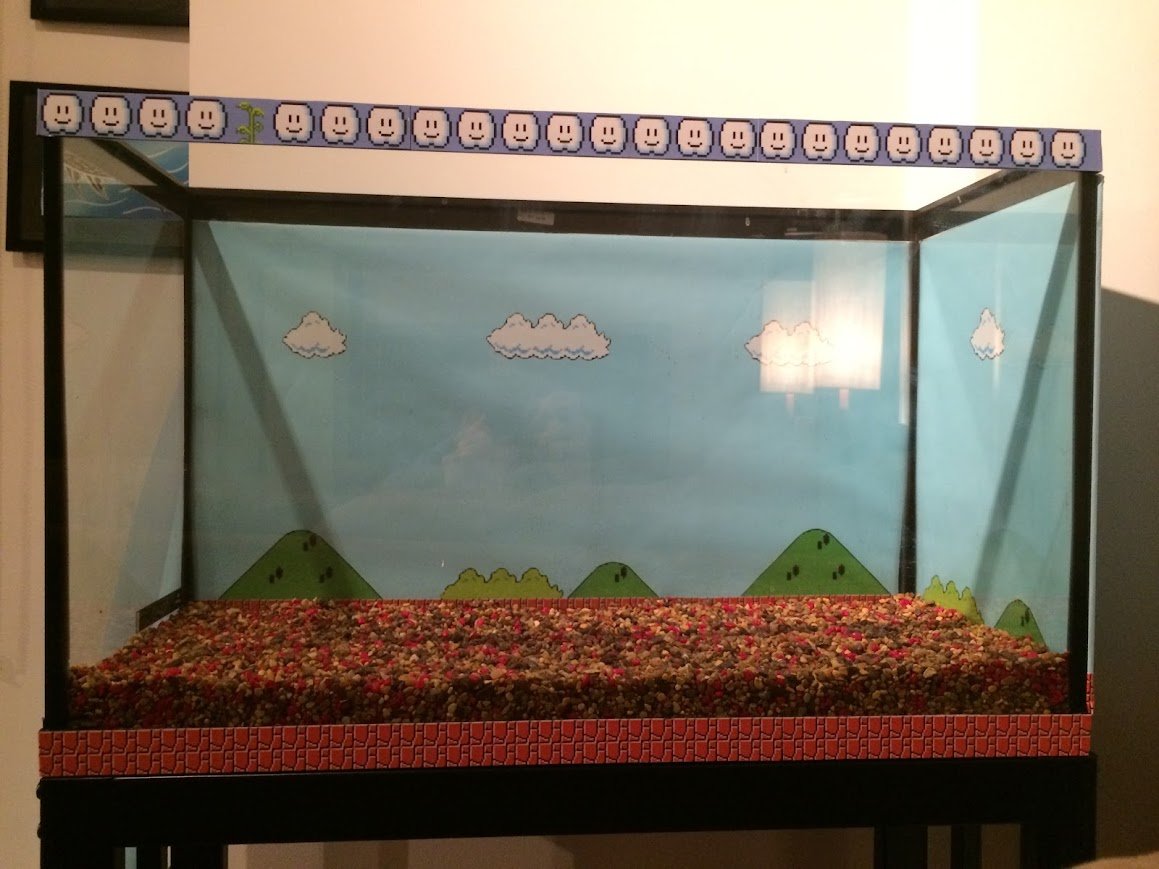
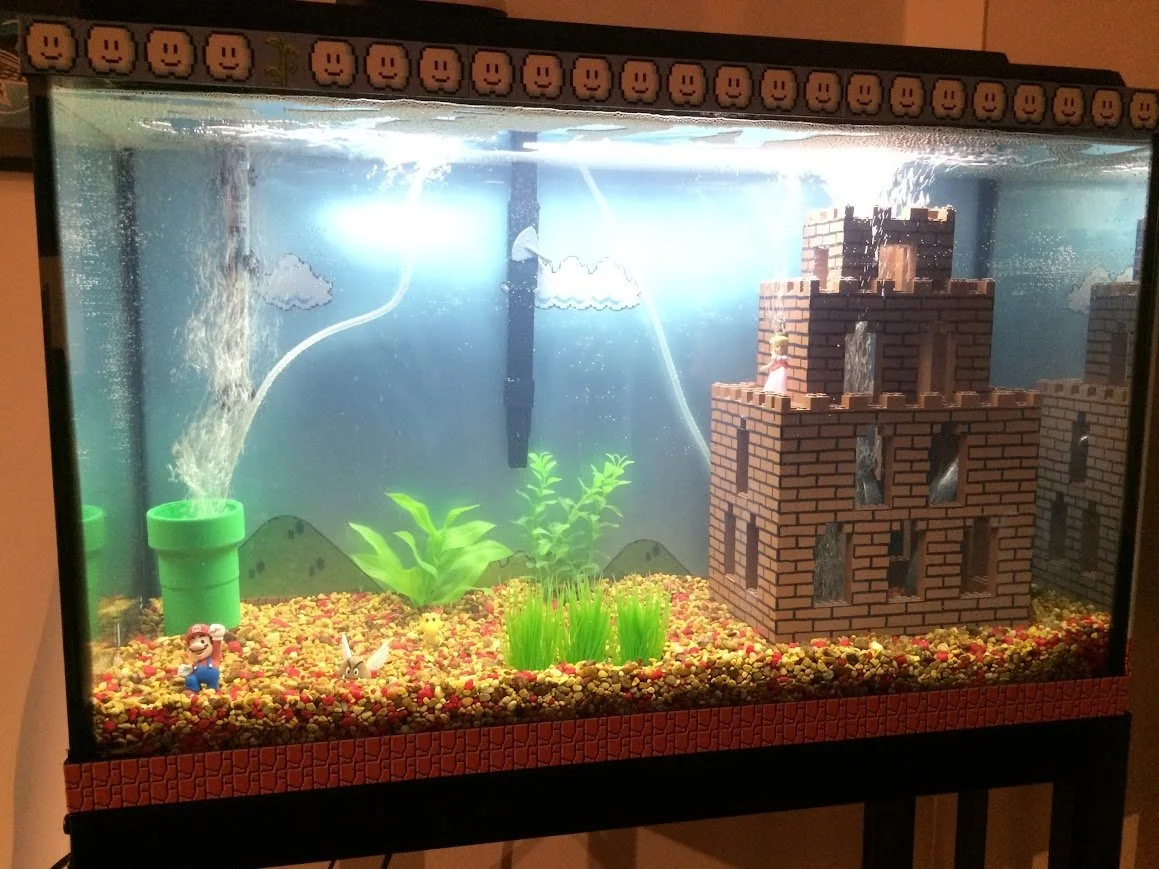
Then I went back to my design and the original images of the levels, and created some background decals that were printed out on vinyl labels and attached to the background paper to create scenery. To make the backgrounds easy to manipulate and remove, I put them on poster board and then taped them back to the outside of the tank. I also made labels for the top edge of the tank with cloud blocks and the single beanstalk, and for the bottom edge of the tank with ground bricks (again, stolen from the other design). Finally, I mixed two different kinds of aquarium gravel (a bright red and a more neutral sand color) to try to match the look of the game. At this point I was getting pretty excited with how it was turning out.
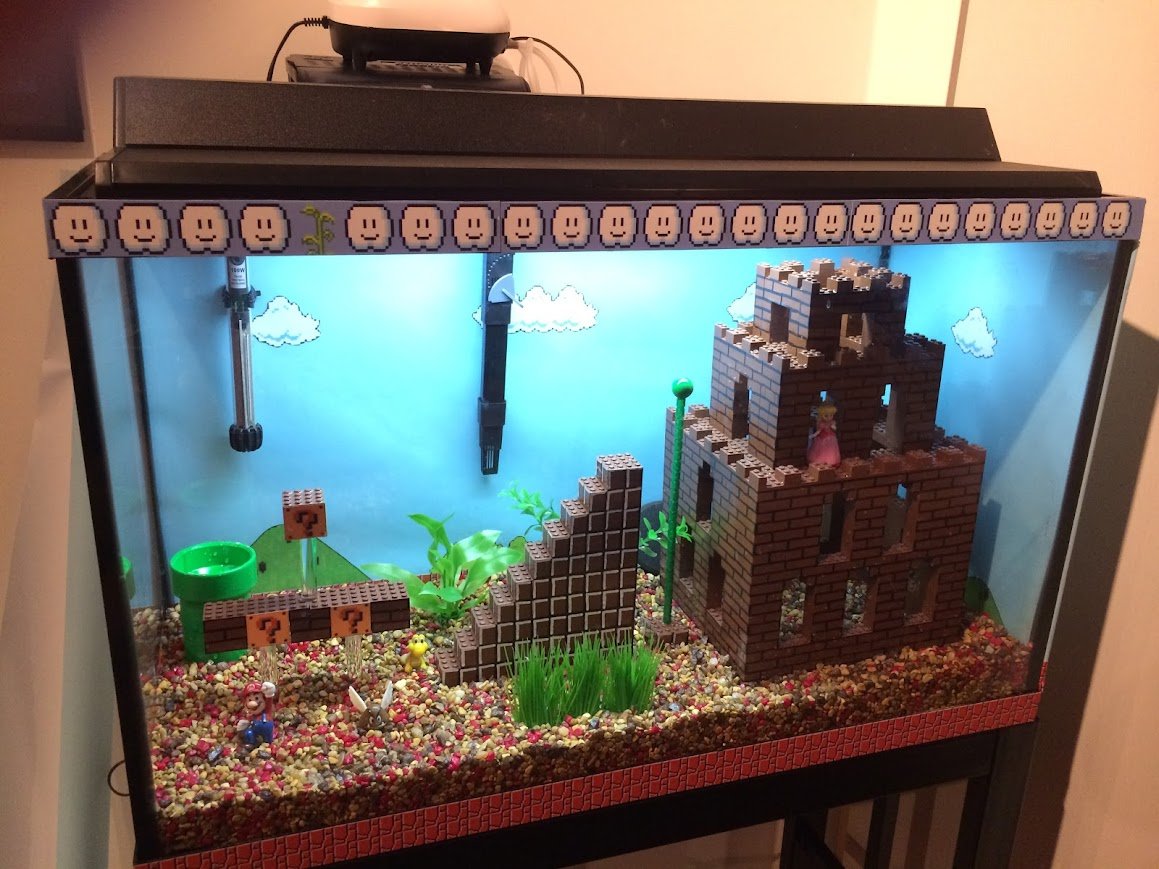
I also used the vinyl labels to create the question marks for the ? blocks, and then built the blocks structure. To do that I cut three equal length pieces of the clear plastic dowel. Two were attached to the first level of 5 bricks on one side, and clear plastic disks acting as feet on the other side. Then the third dowel connected the 5-brick piece to the single brick on the second level.
Finally, everything was coated thoroughly in fish-safe clear enamel sealer. This should provide a plastic-like layer around every component that prevents paint, plastic, adhesive, and anything else from seeping into the water and harming the fish. Unfortunately I don’t remember exactly what product I used for this, but I remember doing a lot of research. Once that was dry, I was able to dry-fit everything in the tank. I also added some fake aquarium plants to match the scene.

Man, it looked awesome. Unfortunately this is the point where the wheels started coming off the wagon. Now of course, I don’t have any pictures from this part. It’s hard to remember to take pictures when you just realized that you are an idiot and the whole project is a failure.
Anyway, I started to slowly add water. There’s a technique where you pour the water onto an upside down plate so that the water slowly distributes and doesn’t disturb any of the scenery. But it didn’t take very much water to see that I had a massive problem, one that is glaringly obvious in retrospect. You see, legos float. They don’t just kind of float, they aggressively shoot to the surface. Not only is the plastic itself buoyant, but there are air bubbles trapped inside each connection of two pieces. It took considerable force just to hold the castle to the ground myself.
At this point I was pretty devastated. I figured I had a handful of options:
Give up
Take apart all the legos and reassemble them with water and/or sand filling between the pieces
Drill tiny holes in all the lego pieces
Find some way to weigh everything down
#1 was tempting, but of course not a real option. #2 and #3 were ideas that I found searching around the internet, but there wasn’t convincing evidence that either would work, and both seemed like huge pains. In addition to having to rebuild everything, I’d have to re-seal them as well. And who knows if the paint would make it through that process. So instead, I ordered a bunch of fishing weights and fishing line. I hoped that I’d be able to add enough weights to keep everything at the bottom without any other alterations.
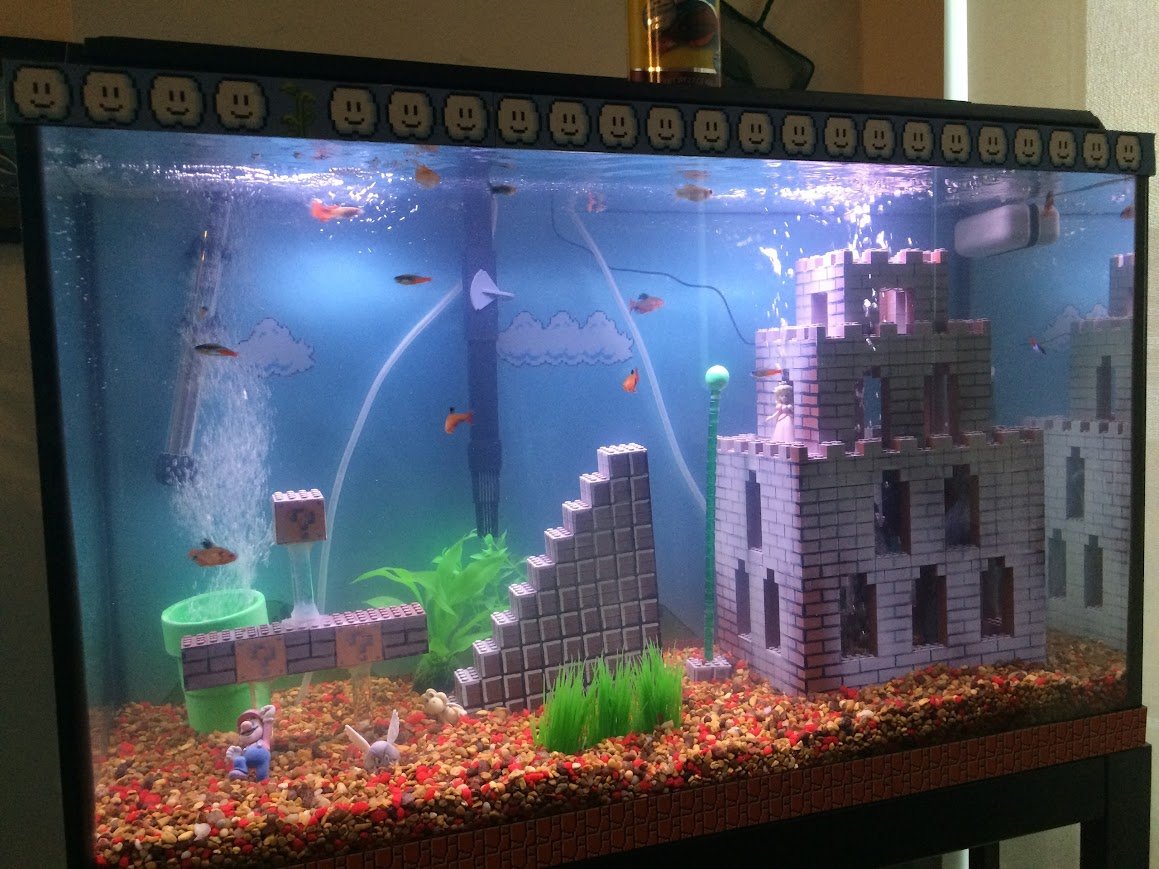
After some trial and error and a lot of weight, I was able to get the castle to stay in place. Fortunately the castle provided a natural place to hide the weights inside, so it still looked pretty good. At this point I had also gotten a fish tank bubbler and had lines running to both the warp pipe and the castle so that each had a stream of bubbles coming out.
Piece by piece, I was able to get all the legos back in the filled tank. The brick blocks weren’t too bad because I was able to attach weights directly to the plastic feet. The stairs were definitely the most challenging since there was nothing really to tie into. I ended up separating the bottom two layers of legos, running fishing line along the length between them, and then re-attaching them. But even then you can see a lean to the stairs because there was so much more buoyancy on the right side.

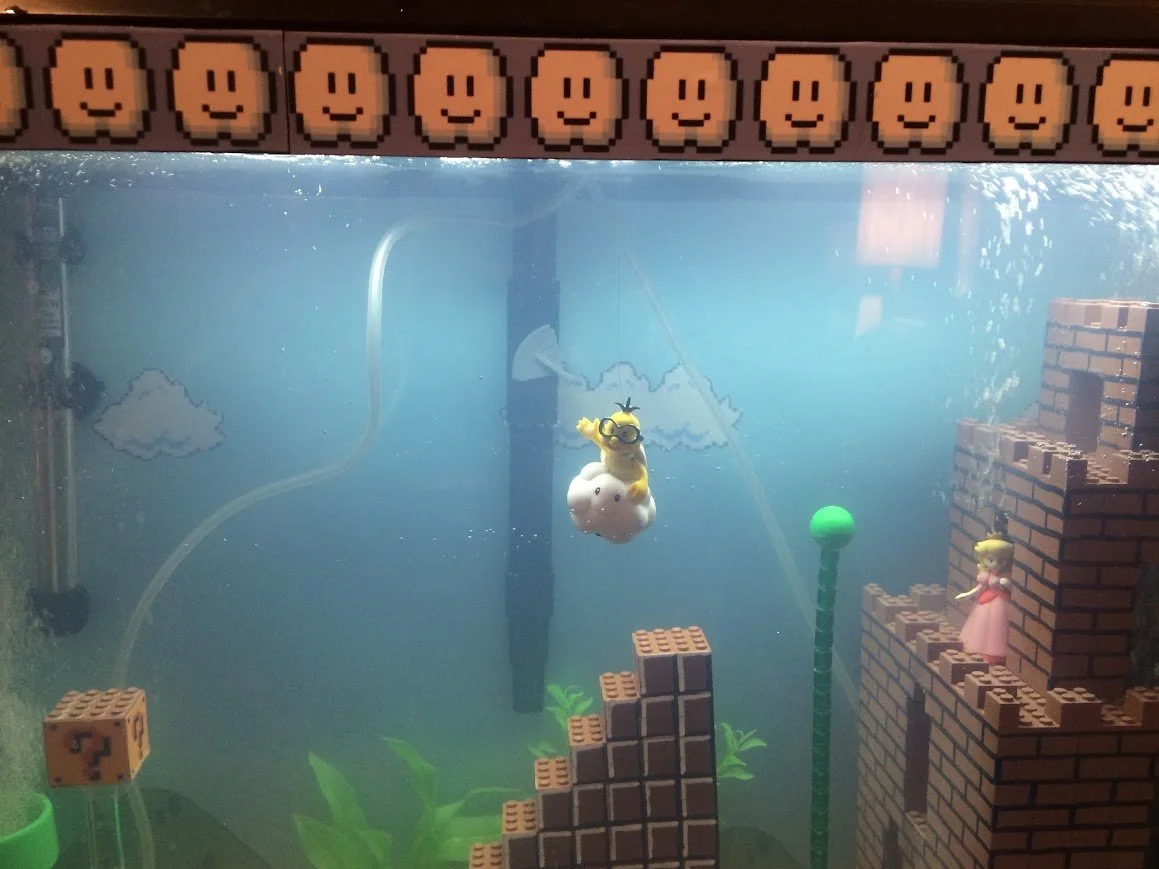
But even with the few shortcomings, I was still pretty excited to be back to this point with water in the tank. The last step (and really the crowning achievement of the whole thing) was to add a floating Lakitu suspended from the top by fishing line. The only thing left was to add fish!

I loved this project. It was one of my favorites to do and remains one of my favorites to talk about (In fact while writing this post I was having some major deja vu until I finally remembered I had actually given a short speech on the Mario Fish Tank for some class in business school).
The tank held up pretty well. In the last picture you can see that some white-ish film quickly developed on the pieces, but beyond that everything kept together. Lakitu actually became pretty annoying because he was always in the way during maintenance and cleaning, so he didn’t last that long. I had fish thriving in this tank for a couple of years before moving across the country. The fish were given a new home, and—as is always the case with fish tank scenery—the Mario pieces were so disgusting that it was obvious they were headed for the trash.